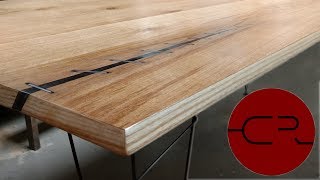
Making a Rebar Dining Table
Channel: lignum
Category: Howto & Style
Tags: wooden tabledining tabletable ideassteelworkingprojectunique designdinner tablerebar weldingtime lapselive edgemodernwoodworkingindustrial tablefurniturediydesignwood & steeltable productionindustrial designsmooth rebartablesmoothtable topkuka robotmakingtable diyweldingtabletopdiningindoor furniturerebar tabletable buildsteel basetable artsteel dowelscontemporarybuildrebarsteel legsdeskwood and steelmatte
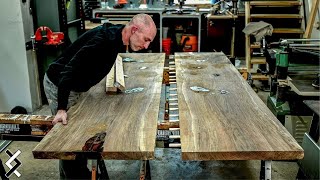
Description: Inspiration for this table came from tying all that rebar for my house project:). With winter weather, I'm spending less time on the construction site so why not start on furniture for the house. For the base I used 6mm smooth rebar/dowels although regular rebar would work as well, I guess smooth will be easier to maintain. I made a jig on a table to place the bottom of the legs and the base to their right position. The steel base was made from 440x120x4mm steel pipes which I cut and welded into a rhomboid shape. I marked the position of each rod and then it was simply a matter of measuring the lengths of each rebar piece, cutting it and welding it to their marked position. All together, there were 112 rods of different lengths, all together approximately 100 meters. After all the welding , I spray painted the base with clear varnish for steel and other metals. Wooden tabletop was made from ash and mahogany. Mahogany was used as strips instead of wooden dowels, I thought it would look nice after trimming the edges of the table top. I planed each plank first with kuka robot and then with a planer. Grooves for the mahogany was also done by cnc robot. For gluing the pieces, I used one component polyurethane glue, It has great water resistant properties and it also expands to fill all the imperfections the robot may have done. After drying, I cnc milled the bottom of the tabletop in a shape of the steel base so it would sink in for about 1 cm. I sanded it first with belt sander 100grit and then with orbital sander 400 grit. I applied a few coats of water based varnish on both sides with light sanding in between each coat. I applied it with a brush. After drying, I connected the base to the top using 6x30mm screws. I hope you like this this project! Please ask any question in the comments and as always, subscribe for more!:D Website: lignum-art.com Email: info@lignum-art.com My instagram: instagram.com/lignum_channel/?hl=en My facebook:facebook.com/lignumchannel Music: Piano Concerto No. 21 in C major, K. 467, 3rd movement Taipei KHS Concert Hall Taiwan, June 2011 Giorgi Latsabidze, piano; David L. Wen, conductor; Hsinchu Chamber Orchestra, Taiwan Sausa11 Music licence: creativecommons.org/licenses/by-sa/3.0/deed.en Intro music: Danse Macabre - No Violin by Kevin MacLeod is licensed under a Creative Commons Attribution license (creativecommons.org/licenses/by/4.0/) Source: freepd.com/Classical/Danse%20Macabre%20-%20No%20Violin Artist: incompetech.com