How to Cut and Install Drawer Liners in your Toolbox
Channel: 4DIYers
Category: Autos & Vehicles
Tags: tool boxhuskyfoamhow to paint a tool boxmechanictoolbox drawersboxus generaltool chesttoolsu.s. generalmactoolssnaponorganizetoolbox linersnap onhow to installlinertool protectioncleaningmatcotool techdrawer lining4diyerssnap-onhow to paint a toolboxprevent rusttoolbox organizersyukonprotect toolsdrawer linerpaintingorganizerbeachorganizationtoolboxtool cabinetmac toolspaint protectionlining toolboxhow to cut
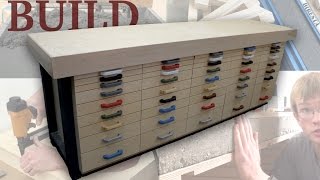
Description: How to cut and install liners in your toolbox. There are various types available on the market, some are rubber, vinyl, or foam style. I’m not a huge fan of the foam style as I find it’s harder to clean if needed and can also tear easier. This can be purchased online, at your local hardware store, a tool supplier, and even some big box stores that have this. This particular rubber is labeled as a toolbox liner, but it can sometimes be labeled as a floor liner or mat. This will prevent tools from sliding around to a certain extent, makes the drawers easier to clean, and most importantly protects the drawers. #toolbox #organization #garage Website: 4diyers.com Patreon: patreon.com/4diyers Facebook: facebook.com/4diyers Twitter: twitter.com/4DIYers Instagram: instagram.com/4diyers Tumblr: 4diyers.tumblr.com Pintrest: pinterest.com/4diyers Tools/Supplies Needed: -rubber, vinyl, or foam drawer liner -razor knife -ruler -square -tape measure -cleaning supplies Chapters: 00:00 Intro 01:07 Measuring the Toolbox 02:22 Marking the Material 03:14 Cutting the Material 04:19 Installing the Liner Procedure: First is measuring the drawers. Toolbox designs do vary, some drawers may have the same dimensions which makes the process a little easier. You may have rolled edges on the top or folded edges on the bottom where the mat will sit, these are things that you’ll need to take into account when measuring. Use the same tape measure for the whole process if you want to ensure a tight fit. Or at least make sure you have two tape measures that have the same accuracy. Not all tape measures have the same accuracy, so be mindful of that. You can use the hook on the tape, but can also start at the 1 inch or 10cm measurement first, just make sure your numbers are recorded correctly. This too helps with some accuracy, the hook can have accuracy issues either from new, from use, or even damage. As for which measure I prefer, if you’re comfortable using metric, for the most part, it’s the more accurate option. Not all tape measures have a 1/32 increment or it’s only up to a certain distance such as 6” on this tape measure. 1/16 of an inch is equal to about 1.5mm, therefore it’s not as accurate. If you have a folded edge in the bottom, measure the thickness of the metal used in your drawers and subtract that from your measures on the top of the drawers. With the color being black, it can be hard to see any markings so I would recommend using tape to mark out the cut points. A pencil or a fine tip pen can be used. Considering this was cut from a roll, there’s a good chance the end may not be square, so that’ll need to be fixed which I’ve already done here. A square is a big help for checking any cuts or marks, the large the better. If you don’t have a square, you can take diagonal measurements instead. This is the 3, 4, 5 method. This can be done using metric or imperial, the larger the dimensions, the more accuracy you’ll have. The bottom corner would be 90 degrees, measure 3 up, either in metric or imperial. 4 over, then the final measurement is 5. You can double the numbers to 6, 8, 10, or even multiply by 10, which would be 30, 40, and 50. A razor knife will give a clean straight cut, just make sure you have a new blade or change as needed. The back for cutting is a large strip of spring steel, this is just to protect the floor. You may consider using a smooth wood back or a cutting mat. Once you have those marks in place, using a ruler, make the cuts. I used my foot to hold the ruler on the opposite side and before removing the ruler, make sure the rubber is fully cut. Otherwise, it can be tricky matching the same cut line. Cutting with the rubbing can be tricky, I have found at times, I may need to make a thin cut on the opposite side so I’m not cutting directly on top of the rib. Typically I’ll make my cuts 1mm or a 1/32 smaller than my drawer measurements. This will give the mat a little movement with temperature variations and account for out of square drawers. Before the mat gets installed, I always clean the drawers. When the mat is stored in a roll, it does tend to keep its curved shape, especially in the cold so it can take time for it to flatten out. It’s best to place heavy items on the mat so it doesn’t catch on the drawers until it’s flattened out. If any oil, grease, or dirt gets into the drawers, the mats can be easily removed and washed. If you have a new toolbox, this will even protect the drawers from any harsh chemicals. Thank you to all those who watch my videos and support my content. Don't forget to subscribe to my channel for future tutorial videos and like my video if you found it helpful. New videos are always being uploaded every week! © 4DIYers 2013 All Rights Reserved No part of this video or any of its contents may be reproduced, copied, modified or adapted, without the prior written consent of the author.