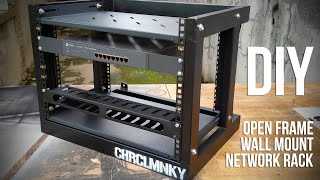
DIY Homelab Open Frame Wall Mount Network Rack
Channel: Charcoal Monkey
Category: Howto & Style
Tags: diy homelab racktp link gigabitwall mount railstartech rack6u railsgigabit switch rackubiquiti rack8u rail rackhome network switch rackreddit homelabdiy rail rackdiy network rackdiy server cabinetnetworking upgradeubiquiti rack mountdiy open frame rackhome network rack mountrackmount railshomelab1u cantilever trayrack mount trayserver rack builddiy home networkdiy rackmount framewall mount server rackserver rack rails
Description: I made plans on upgrading my home network cabling and structure long way back the year 2017 and has never been executed since then. Until recently, determination has gone up after seeing so many impressive home server and network setups in r/homelab and r/ubiquiti on Reddit. Which I happened to have posted the photos of this project as a teaser and never I would knew that it become an instant hit there on Reddit r/homelab. The post was upvoted more than 1,100 and gathered 3 wholesome and 6 silver awards! You can check out what is going on there at Reddit on this link - reddit.com/r/homelab/comments/oavzbe/openframe_wall_mount_racks_are_a_scarce_and First thing in mind is to obtain an open-frame rail rack that can be mounted on walls, so I checked out the major online marketplaces to window-shop for a small network cabinet just about to fit a rack-mount switch, power distribution unit and cable management accessories. But locally sold server rack cabinets' costs were somewhat unfriendly despite their overall quality and aesthetics. Gladly, main components like rack rails are available in the cheap, mostly sold by flight case manufacturers and suppliers. And shopping list goes on... All I have to do is to weld a frame for the rails and save me a lot of money! Without a further ado, let's begin build a very sturdy, compact and legit-looking home network rack frame: 00:00 - Unboxing 8U rack rails, a couple of 1U universal cantilever trays and bags of cage nuts and m6 bolts. 00:15 - 3D schematics on TinkerCad link - tinkercad.com/things/lvg6Rgqd73G 00:40 - Modified t he rails by cutting a small part to fit the not-so universal 1U rackmount tray. 01:15 - A light steel tubing 1" x 2" is very cheap and is perfect for the purpose. All works using gasless MIG welding machine, couple of angle grinders and such starts here. 02:45 - Roast my weld for I am the world's best welder. 03:45 - Welding metal wall mounting screw holder. 05:35 - Drilling bolt holes to steel frame to bolt down rails, top and bottom trays into place. 05:45 - Shameless plug: Painting the CHRCLMNKY logo on the newly finished frame. 06:35 - Custom made open frame rack is DONE! Time to assemble by bolting the network components like gigabit switch, PDU (power distribution unit) and cable management accessory frame. I think we just wrapped that awesome DIY welding project for today and watch out anytime on the month of July, I will upgrade my small home network and will upload a video as well. So hit that subscribe button and see you all awesome people on the next video!