Build a Custom Servo Motor with a DC Motor
Channel: DroneBot Workshop
Category: Howto & Style
Tags: seeeduino xiaojeremy fieldingservo motordiy servo motor controller
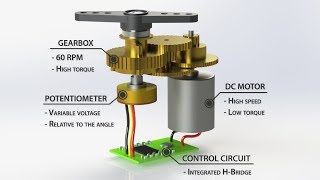
Description: Today I’ll convert a DC motor into a custom servo motor using a Seeeduino XIAO. Plus, we’ll learn about using PID controllers. This is a special project that I’m working on with Jeremy Fielding. You can check out Jeremy’s video here - youtu.be/1e5mLdjoKrc Article with all the code: dronebotworkshop.com/custom-servo-motor More articles and tutorials: dronebotworkshop.com Join the conversation on the forum: forum.dronebotworkshop.com Subscribe to the newsletter and stay in touch: dronebotworkshop.com/subscribe Servo motors are used in many hobby and experimenter applications. From radio-controlled aircraft to robot dogs, these motors are used whenever you need to be able to precisely position a motor shaft. But most hobby servos are small devices, and even “large” hobby servos are not really all that large, and can only supply a limited amount of torque. Plus, larger servos generally mean a larger price tag. Another limitation for some designs is that hobby servo motors are usually limited to either 180 or 270 degrees of rotation. So why not build one ourselves? After all, internally, a servo motor is simply a DC motor with a control and feedback circuit. And you can buy, or salvage, a large DC motor for a lot less than the cost of a big servo motor. Today, I’ll show you how to convert a DC gear motor into a custom servo motor. One that can rotate exactly to suit your requirements. I’m doing this in tandem with Jeremy Fielding, a YouTuber with incredible mechanical and design skills. Jeremy is building a “self-driving go-kart”, and for his steering system he will need a big servo motor that can spin a full two turns (720 degrees). I’ve come up with a design that uses a Seeeduino XIAO and a 10-turn potentiometer. While I’m driving a fairly powerful motor driver, you can substitute a smaller, and less expensive one if you don’t require the big motor Jeremy requires in his design. Incidentally, a potentiometer isn't the only method of sensing shaft position, it's just the cheapest (and probably most common) method. The article accompanying this video has a few other sensor types that can be used, and we'll be looking at those in future videos and articles. Here is the table of contents for today's video: 00:00 - Introduction 03:17 - Custom Servo Design 06:39 - Servo Test Setup 09:20 - Controller Design with Seeeduino XIAO 14:17 - Input Test Code & Demo 19:47 - Endpoint Test Code & Demo 22:57 - PID Controllers 28:58 - PID-based Servo Controller Code & Demo 39:19 - Conclusion Jeremy’s “self-driving go-kart” is a project that is being built in tandem with my 6-wheel rover, so you’ll be seeing more collaborations in the near future. Make sure you check out Jeremy’s video at youtu.be/1e5mLdjoKrc