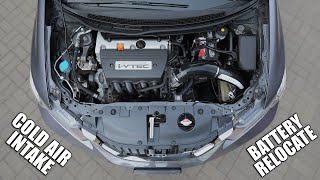
Acuity Carbon Fiber Intake & Battery Relocate Install // 9th-Gen Civic FBO Part 2 of 4
Channel: milanmastracci
Category: Autos & Vehicles
Tags: how tocold air intake installmod2012cold aircaibatteryremovecivicwhich intake is bestskunk2ktunedmilanmastracciacuityoemintake installmanifoldmilmastintakecivic si9th genupgradeswap9th gen civichondak24best intakebest 9th gen intakefborbcrelocate2015tunedinstall201420139th gen honda civic siremovalfb6automotivebumpershort ram
Description: Do you know how to turn a bolt, loosen a clamp, and push down on a lever? If so, installing this carbon fiber cold air Intake and battery relocate from Acuity will be a piece of cake for you! Acuity offers a wide variety of parts for the 9th Gen Civics, and their first performance part to be featured on the channel is their intake and battery relocate kit. Their intake will allow my engine to inhale a bit deeper than the stock setup, while also making servicing the vehicle much easier due to its design and simplicity. When you purchase one of Acuity’s cold air intakes for your OEM manifold & OEM TB configuration, if you decide to upgrade your manifold, throttle body, or both, Acuity has you covered with different couplers for your application. Links for all of them will be found below. Feel free to take a look at the products I’ve outlined in this video. By purchasing items below, it helps my channel operate and brings more awesome content your ways. Thank you all for your generous support!! 💙 ▀▀▀▀▀▀▀▀▀▀▀▀▀▀▀▀▀▀▀▀▀▀▀▀▀▀▀▀▀▀▀▀▀▀ ▶︎ Amazon US - amzn.to/2DUGfFs ▶︎ Amazon CA - amzn.to/2Go8QV2 PARTS ▶︎ Acuity CURL Cold Air Intake (for stock intake manifold) - bit.ly/2TuUP0I ▶︎ Acuity CURL Cold Air Intake (for RBC/similar intake manifold) - bit.ly/2UiM6ik ▶︎ Acuity Replacement CAI Filter - bit.ly/369oH5s ▶︎ Acuity RBC/similar to OEM TB Coupler - bit.ly/3dD9zBA ▶︎ Acuity RBC/similar to ZDX TB Coupler - bit.ly/3xhjgNR TOOLS & SUPPLIES ▶︎ Expandable Braided Sleeving - amzn.to/3yfWKVO ▶︎ Electrical Tape - amzn.to/3AnuthV ▶︎ Foam Sound Deadening - amzn.to/3dF6UHx ▶︎ Olfa Serrated Scissors - amzn.to/2TxddWT ▶︎ Acuity Panel Removal Tools - amzn.to/3vh7YqZ ▶︎ Low Profile Jack - amzn.to/3yKaRnr ▶︎ Aluminum Jack Stands - amzn.to/3c5mOu9 ▶︎ Neiko Hex Bit Set - amzn.to/3jEEzox ▶︎ Milwaukee M12 Cordless Ratchet - amzn.to/3An4YgB ▶︎ Gearwrench Screw Driver Set & Tray - amzn.to/3jMyiHo ▀▀▀▀▀▀▀▀▀▀▀▀▀▀▀▀▀▀▀▀▀▀▀▀▀▀▀▀▀▀▀▀▀▀ I truly hope you guys enjoyed this video! If you have, help me out by liking the video and stay staying up to date with my ▼ 🎥 YouTube Channel - bit.ly/2YBd5nf 📸 Instagram - bit.ly/36quS3t 💻 Facebook Page - bit.ly/2E6VXfH If you have any additional questions, feel free to send me an email at milanmastracci@gmail.com. Be sure to tag me on instagram @milmast with your projects. Thank you so much for watching!! 💙 #TorqueSpecsBelow Driver engine mount to chassis - 3 @ 17mm head - 55 ft lbs Battery ground cable bolt - 1 @ 10mm head - 7.7 ft lbs ECU mounting bolts - 2 @ 10mm head - 7.7 ft lbs Lug Nuts to wheel studs - 10 @ 17mm head - 80 ft lbs Feel free to take a look at the following PDF that outlines Acuity’s install process for this intake (bit.ly/3Ar5tGr). Video Chapters (0:00) Introduction (1:22) Unboxing & Package Contents (3:53) Front Bumper & Radiator Cover Removal (6:37) Battery Removal (7:40) Factory Intake System Removal (10:01) Engine Bay Prep & ECU Removal (11:22) Battery Tray Base Removal (11:40) Battery Harness Rerouting (14:13) Removal Overview (14:54) MAF Sensor Transfer Process (15:18) Relocated Battery Tray Base Install (16:35) Battery & MAF Harness Rerouting (17:47) Installing Battery (18:40) Coolant Line & PCV Hose Rerouting (20:20) Wire Management (21:04) Acuity Intake Assembly & Installation (23:22) PCV Hose Fitting (23:56) Overview (24:42) First Drive & Initial Impressions (26:20) VTEC INDUCTION NOISES (28:38) Final Remarks #ColdestAirIntake #AcuityInstruments #ProperCivicBuild