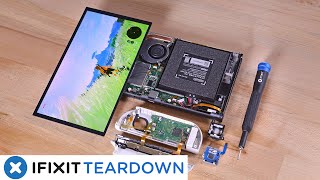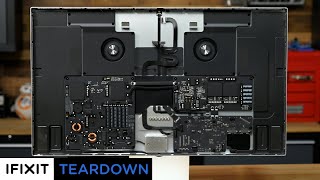
Studio Display Teardown: Is this secretly an iMac?
Channel: iFixit
Category: Science & Technology
Tags: repairhow to5k imac displaya13mac studio27 inchstudio display applemac studio displaydisassemblystudio displaystudio display teardownstudio display reviewtechnologyifixitapple displayapple studioapplefixmac studio review60hz displayapple studio display reviewteardowngadgetsmac studio teardown
Description: Last week we got a little ahead of ourselves and popped the Studio Display open during our Mac Studio teardown—we’ve got the link in the description if you missed it—but we’re back for a deeper dive into this dense display. Check out our Mac Studio Teardown! youtu.be/TYF527DqnwY You’ll need a little more torque than normal to take apart your Studio Display. Check out our Manta Driver kit! ifixit.com/Store/Tools/Manta-Driver-Kit--112-Bit-Driver-Kit/IF145-392?o=1?utm_source=StudioDisplayTD&utm_campaign=YouTube&utm_medium=Description Chapters 00:00 Introduction 01:03 Opening the Studio Display 01:36 Removing the Studio Display’s Camera 02:12 A closer look at the Studio Display’s Display 02:27 Removing the Studio Display’s Power Cable 02:35 Removing the Studio Display’s Power Supplies 02:51 Removing the Studio Display’s Massive Fans 03:11 Removing the Studio Display’s Logic Board 03:24 Removing the Studio Display’s Speakers 03:50 Removing the Studio Display’s Ports #Apple, #StudioDisplayTeardown, #iFixit Subscribe to our channel for all our latest teardown and repair videos! youtube.com/subscription_center?add_user=ifixityourself Follow us on Twitter: twitter.com/ifixit Check us out on Facebook: facebook.com/iFixit studio display teardown