Making a Carbon Fiber Motorcycle Rally Fairing - DAY 3
Channel: Matthieu Libeert
Category: Howto & Style
Tags: mouldmakingfairinghow totoolingaramidcutpartdremelby handeasy compositesvinylestervartmlayerresin infusionbikecompositesmotorcyclematthieu libeertyamahafiberglasspolyesterglossvacuuminfusionoff roadcarboncoupling coatfinishkevlarbelgiumrelease agentrallyuni mouldchopped strandsfiberusingglass fiberktmepoxymake amoldhondaresingelcoatfront fendermould
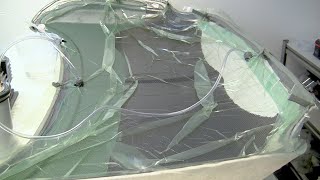
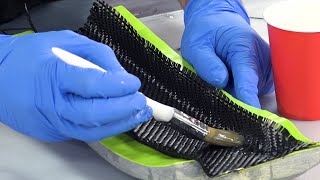
Description: In this video I show you how we make a Motorcycle rally Faring from scratch. Bert Boute, From Story Of B, is helping me out with the build of his motorcycle fairing. Link to day 1 youtu.be/_uEZWEa8cUk Link to day 2 youtu.be/_4cSwWrs2Q4 Link to day 3 ( this video) youtu.be/YlTXOLPDSi4 This is the Third part of these series where we talk about how we go from plug to mould. To make the mould we are using the uni-mould tooling system from easycomposites. First a release agent is being used. We've used the chemical release agent from easy composites here. You have to apply the liquid on a piece of lintfree cloth and apply a new coat every 15 minutes. You'll see the release agent evaporate after each coat. After applying 5-6 coats you wait one hour to make sure that all the solvent evaporate. Gelcoat: The gelcoat used is called uni-mould tooling gelcoat. It's a black gelcoat where you add between 1-2% of MEKP hardener. The hardener will make sure it will cure to a tacky state. The tacky state is where the resin is hard but still tacky so it can chemically bond to the following layers. In our case we had to wait for about 3 hours. Coupling coat: The tooling coupling coat will make a nice bond between the gelcoat and thick tooling resin. imo this is the most important layer as it is right behind the gelcoat so make sure you have no airbubbles or wrinkles in that layer. We use this resin with a 100g square meter chopped strand fiberglass. you will roughly need the same amount in weight as the gelcoat to coat the entire surface. Use a roller to remover any trapped air and go in the tight corners. This layer will cure after around 1 hour so you can proceed with the next layer: Uni-mould tooling resin: This is the coat that will add the stiffness. application is exactly the same as with the coupling coat. You will just need to apply more layers of a 450 chopped strands fiberglass. the resin is catalyzed with 1% of mekp in our case. this all depends of the ambiant temperature, amount of resin mixed, speed of application. after building a thick and strong coat you'll see the resin change colour to a vanilla white. Finishing: Once the mould has cured after 2 days at 25°c ideally you can proceed with the trimming and sanding of the flanges, if needed you can easily repolish or sand any defects in the mould. After that you apply release agent and you are ready for your first part! In part 4 we will do the lay up and make the part! make sure to subscribe to follow this project! Make sure to follow Bert on Instagram: instagram.com/bertboute Facebook: facebook.com/BertsStory For more of my projects Make sure to follow me on: Facebook: facebook.com/MAT2COMPOSITES Instagram: matthieu.libeert twitter: @matthieutje65 web: mat2composites.com #Creator #howto #motorcycle #mouldmaking