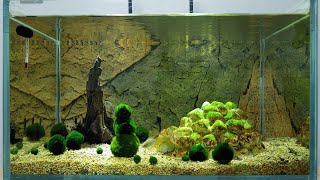
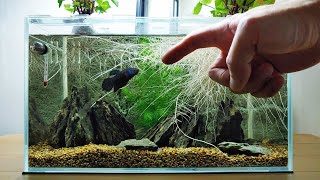
Ep. 2 Igloo Tank (The Final Build) 10 gallon Internal Sump Aquarium
Channel: Foo the Flowerhorn
Category: Pets & Animals
Tags: aquarium gluefilter mediaaquarium sumpgnossienne no.5bafflesgluing rocksbetta tank setupiglooerik satiesetting up aquariumnano tankaquarium siliconeaquarium epoxyaquarium backgroundinternal sumpaquarium setupaquarium filter mediabuilding aquarium10 gallon aquariumgymnopedie no.1building aquarium sumpaquarium lightaquarium pumpnano tank setupgymnopeidiebetta tankaquarium buildrock glue
Description: First of all, working with superglue and epoxy can be hazardous. I had all the windows open and tried not to breath in too much of the fumes. With cutting glass, I used a very wet sandpaper to dull the edges, and then washed the glass in running water. I used wet sandpaper b/c I didn’t want to breath in glass dust. Making the igloo: I first used aquarium safe silicon to stick the pebbles together. Later I realized that the pebbles should’ve been washed and dried before using silicon. It still didn’t matter b/c silicon doesn’t hold the pebbles together that well. If I were to do it again, I would’ve skipped the silicon part and just used Loctite 401 and cotton. I don’t know if just using the Loctite would work in the long run, but I decided to use the epoxy, too, for the underside. For the tank itself, there are a hundred measurements, so I omitted them in the video. The tank itself is LxHxW 45x26x35cm or (18x10x14inches roughly) – around 10 US gallons/ 41 liters. 8mm thick low iron glass custom made for me at a LFS. They outsource it to make it, but I’m not sure where. The thickness of baffles was decided by measuring the pump, and made it wide enough to fit it in there. If you’re curious about any other measurements, comment here, or email me. I’ll try to answer them. I actually omitted two functions from this tank. Originally, it was going to have an auto top off and an automatic water drain system when I turned the pump off, but it was going to be too time consuming to build. I still might do an auto top off later. The last chamber in the sump is where the water level drops as the tank water evaporates, but since there’s a lid, the evaporation should be minimal. However, I do have to periodically check the last chamber to make sure there’s enough water. Some of you might’ve noticed it, but the background is the leftover from making Kartoffel’s tank. Patreon: patreon.com/footheflowerhorn Merch: teespring.com/stores/foo-store Some of the tools I used: Dremel 3000 with Flex Shaft : amzn.to/32yrPqx Dremel 561 Multipurpose Cutting Bit: amzn.to/32yhwCS Dremel Diamond bit: amzn.to/33ASQZZ loctite 401: amzn.to/2FDHSKQ Loctite gel: amzn.to/2FJGUwQ Aquamend Epoxy: amzn.to/3kqvoW9 Loctite Clear Silicone: amzn.to/3moOq0M Gyokucho Double Blade Saw: amzn.to/3kmXktO 503 Torch: amzn.to/2ZExtWA Substrat pro: amzn.to/2ZEAKVy Siporax: amzn.to/3knhggo Better Similar light (Lominie LED Aquarium Light): amzn.to/3mumvga Suisaku thermometer: amzn.to/3iAY3Y1 (I switched out the thermometer to a smaller one) Glass cutter: amzn.to/3iCr1Xh Music: Erik Satie Gymnopedie no.1 Gnossienne no.5