DIY Epoxy Countertop Success? Tips and Lessons from Making Faux Marble Counters over Plywood
Channel: DIYTyler
Category: Howto & Style
Tags: diy epoxy countertopsdiy countertopsdiy epoxy tablefaux marblestone coat countertopsdiy epoxy countertop spray paintcountertop finishing kitepoxy countertops tips and lessonstotalboat countertop epoxydiy epoxy countertop for beginnersresin artdiy epoxy countertop faux marbleepoxy countertopsdiy epoxy countertop mdfdiy epoxy countertop over plywooddiy epoxy resindiy epoxy countertopdiytylerepoxy countertop diydiy epoxycountertop epoxy
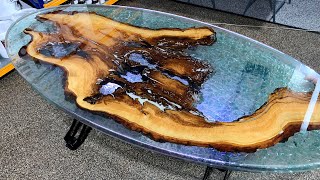
Description: Can we call our DIY Epoxy Countertop Success? We definitely learned some lessons that will help us pour a better epoxy counter next time BUT we took the failures and turned them into a successful result and a beautiful faux marble counter top. Bit thanks to @TotalBoat for supplying the product for the counters and sponsoring the channel. totalboat.com You can also purchase total boat products on Amazon: amzn.to/3s8BEGG Get your DIYTyler Swag and all other work gear from @KeyApparel DIYTyler.com/merch 📔📙All our Digital Plans: bit.ly/2Mm6slA We used Total Boat tabletop epoxy resin to pour the counter tops over a double layer of 3/4" particle board. 1) We installed the particle board substrate, sealed the wood with a rolled on layer of epoxy (Lesson 1, we should have tinted this layer of epoxy to help us get better final color coverage. I mentioned painting the particle board in the video but this may not be a good idea, may cause the epoxy not to adhere perfectly.) 2) Sanded the seal layer and taped off the counters to get ready for the main epoxy pour. Make sure you do a good tape job, don't want the epoxy to run away on you! Drop cloths as well! 3) Mix up enough epoxy in your base layer of color. Flood the counters with this layer and spread evenly, this layer will help the colored layers of epoxy flow better. 4) Build up your bucket of epoxy that is colored. We went with a dirty pour method were we mix the colors together in layers separated by a shot of spray paint. Be sure to have small buckets of your accent colors set aside if you want to accent the counters after the main pour. 5) Pour the main bucket of color in a patter of choosing. (We did A LOT of trial and error to get what we wanted.) 6) Accent the counters as desired. 7) After the epoxy has set up a bit take the tape barrier down and let the epoxy slowly drip over the edge. Use trowels and glove covered hands to keep things in control. 8) After the color coat has cured if you want a thicker counter and more protection you can add a final clear coat as we did. Same process, sand, pour clear...watch your edges. Most of the trouble we had was with the edging, we didn't get enough coverage for good color so we had to trim the edge back down to add a trim that was painted the base color. A bit more work but we got a satisfactory result in the end. Hopefully our mistakes will help you! Some tools we use (affiliate links): Propane Torch: amzn.to/3s66zTY Plastic Trowel for Tile or Resin: amzn.to/2LfZCz7 Mixing-Mate Paint Lid: amzn.to/2vXsq7P Epoxy Mixer: amzn.to/3q5reWA FastCap 16oz Glue Bot: goo.gl/X5aNZ0 FastCap 4oz Babe Bot: amzn.to/1KEuIUf Tool Belt: goo.gl/XZnWRx IsoTunes Free: amzn.to/3saPoRi Kreg R3: amzn.to/2DxC6t3 Kreg ACS Track Saw: amzn.to/2OZXVVw Kreg Drawer Slide Jig: amzn.to/355rIBp Kreg Drawer Pull Jig: amzn.to/3fqy5VA Kreg Screws: amzn.to/304j2KK Kreg Clamps: amzn.to/2ZlRyRz Switchpod (mini tripod): bit.ly/2JUMET1 Moisture Meter: amzn.to/2SwBy9i FastCap Tape Measure: goo.gl/t2lWJD Items specific to the finishing setup: Fuji Q5 5 Stage Turbine Spray System: amzn.to/2J2DMei Harbor Freight Toolbox: bit.ly/2VRIEI6 3M Full face Respirator: amzn.to/2BmP3Sb 3M Organic Vapor Cartridge: amzn.to/2VTffgN 3M PPS 2.0 Fitting #18 - 26054 (for T70) bit.ly/2IZlbzp 3M PPS 2.0 Fitting #2 26003 (for T75G) amzn.to/35HjVuH 3M 177 ml Pressurized H/O Cup - 26121 bit.ly/35HrfGB 3M 850 ml Pressurized H/O Cup - 26124 bit.ly/2P006sM 3M PPS Large Cup Ratio Inserts - 16091 amzn.to/2OVvCYF 3M PPS 13. 5 oz Mix Ratio Insert - 16155 ebay.to/2MTx4Z6 3M PPS 2. 0 Cup Lid - 26204 for 177 H/O Cup ebay.to/2J35NSS 3M PPS 2.0 Cup/Cap/Liner/ Lid Standard ebay.to/31qF0pX 3M PPS 2. 0 13. 5 oz Midi Liner ebay.to/2J2h45Q 3M PPS 2.0 mini liner ebay.to/2MO32G4 Follow us: DIYTyler.com instagram.com/diytylerg facebook.com/DIYTyler #epoxycounters #fauxmarblecounter #epoxykitchen