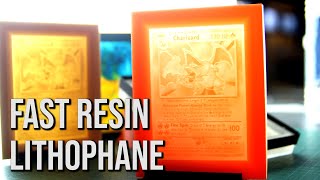
Charizard Pokemon Card Lithophane Resin Cast (Fast way to make Lithophane's with silicone mould)
Channel: Matthieu Libeert
Category: Howto & Style
Tags: how totranslucentblastoisprojecteasy compositesenderfillamentlito3d printingcarvingcurapolyesterwhitelithophanemaker.com3d printpetgbelgiums1lithophanepokemongoimagesettingssiliconeprusiamake astlduplicatefilamentqualityresinlightcontrastpikachuframelitographcolorbestspeedlightboxcnccharizardpolyurethanecastingtutorialcopyjpgmat2slicingplapokemonepoxypokemoncardpicturegreycrealitynozzleresinaabsmachinelitophanefakeanimemould
Description: In this Tutorial I’ll go through making a lithophane using a 3d printer (in my case printed on an Ender 3 S1) One of the downsides of making lithophanes with 3D printers is the long printing times. This Charizard pokemon card took more than 8 hours to print. That’s why I’m taking this tutorial to the next level. I’ll be making a silicone mould of this 3D Printed Pokemon Card and then cast it with polyurethane resin and casting epoxy resin. That way I’m able to cast many parts from the orginal 3D Print using the silicone mould. 1. What is a lithophane: It’s usually a straight surface of thin material which contains a hidden secret. This secret will only reveal itself when light shines on the back of the material and shows its true beauty. This special revelation is expressed in a piece of beautiful art that can include highly detailed images. 2. How does a lithophane work: The lithophane needs to be a thin material, formerly end mostly porcelain, with varying thicknesses. It’s fundamental for a lithophane to have variations in thickness. Thicker parts within the lithophane will block more light than the thinner parts. This way the material can manipulate different intensities of light passing through the material. This creates different contrasts which can be seen with the eye as different intensities of gray. When the contrast is carved out of the material very detailed and precisely it can display very realistic images. 3. About the 3D printing: I went on lithophanemaker.com to create an .STL file from a picture. By changing some numbers you can create anything you want and the website will generate an .STL you can then import in your slicing software (in my case it was cura) For more detailed information on how to set up your printer and slicing software I would advice you to have a look at their videos on their website. The most important things in your slicing software is to avoid travel around your part. Part as small as you can in layer height (0.2 was fine for me here but 0.12 would give even better results) print in the Y-axis orientation (that way your printhead has less traveling) print slowly and use 100% infill or set a high number of layer lines. That way you don’t have infill in your picture. The print was done using additive heroes PLA from 3dprinthings.be in a fluo orang color (thought it would match the Charizard color) But this can be printed in any color, just make sure to use the lighter colors in the spectrum like white and grey as they will let more light through. If printed everything on a Creality Ender 3 S1 with a custom build bed plate I’ve made in a previous tutorial, link to the video can be found here youtu.be/V8A_QTq9WYg 4. About the silicone mould: After printing the mouldbox and sealing the edges to avoid leaks. I’ve used some silicone to make a negative of our original 3D print. polyestershoppen.be/siliconenrubber/siliconen-gietrubber-shore-15-216.html for the silicone used. I’ve mixed the silicone first in a cup, mixed, then transferred in a new cup, mixed again (to avoid unmixed resin) and degassed the resin to remove any air in the mixture. The silicone is then poured onto the 3D print into the mouldbox. Best practice is to pour from the lowest point of your mouldbox in one spot and let it flow out. That way you can avoid air being trapped into the surface of your mould. Once it was poured the part and silicone were put back into the degassing chamber to remove any bubbles or air that were still stuck on the surface. About the casting: To cast you have many options. You can cast in polyurethane (like I mostly did in this video) Epoxy resin, silicone, polyester, concrete or even chocolate if you want. For most of the castings here I’ve went for Polyurethane, being a fast cast polyurethane now under the name of P2 from Xencast. Link can be found here easycomposites.co.uk/fast-cast-polyurethane-casting-resin Xencast P2 is a fast setting polyurethane resin making it possible to demould after a short amount of time, therefore making it possible to make multiple castings a day out of the same silicone mould. No release is needed on silicone moulds as no materials will stick to silicone unless silicone itself. To colour your parts you can use pigments or dies. Pokemon Pokemon Pokemon Pokemon Pokemon Pokemon Pokemon Pokemon Pokemon Charizard Charizard Charizard Charizard Charizard Charizard Charizard Charizard Charizard Lithophane Lithophane Lithophane Lithophane Lithophane Lithophane Lithophane Lithophane 3d print 3d print 3d print 3d print 3d print 3d print 3d print 3d print 3d print 3d print 3d print Facebook: facebook.com/MAT2COMPOSITES Instagram: matthieulibeert twitter: @matthieutje65 web/mail: mat2composites.com #Pokemon #Lithophane #3Dprint