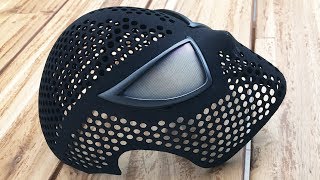
Carbon Fiber Iron Man Mask (How it's made)
Channel: Matthieu Libeert
Category: Howto & Style
Tags: mouldmakingcosplaytoolinghow tocandythe hulkreleasesuperheroblack widoweasy compositesspidermanvartmpepper pottsresin infusionpropmakingredgold3dmatthieu libeertfiberglasstony starkrobert downeypolyestervacuumdiycarbonpropuni-mouldtutorialdiesthanosrescuemaskthormat2fiberepoxymake airon manresinmarvelavengersblueendgamegelcoatindustriessuitcomic
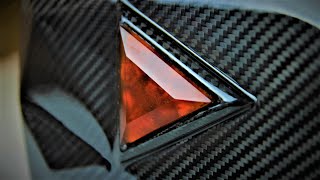
Description: I made a mask for Tony Stark and Pepper Potts out of Carbon fiber with a red and blue tint, These are props I've made to celebrate the love 'I love you 3000' between Tony and Pepper, after seeing the latest marvel movie called Avengers Endgame. How it's made: The mothermould was covered with the Easy Lease, chemical release agent from Easy Composites to be sure to have a good release of the mould. The mould is made with the uni-mould tooling system. First the gelcoat is applied after mixing it with MEKP catalyst. Once the gelcoat is tacky I proceed with the coupling coat that will create a good bond between the gelcoat and tooling resin coming on later. Once the coupling coat is in a tacky state 4 layers of fiberglass are applied with the tooling resin. Around 2,5 kg was used for this mould. The good thing about the uni-mould tooling system is that it will create strong moulds that are resistent till high temperatures and low on shrinkage as well. These moulds are ideal for resin infusion or any work with epoxy resins. The part itself is made out of a 650g/m² twill weave carbonfiber. around 2 layers were used followed by some peelply for an easy removal followed by an infusionmesh for a good flow of resin. Once everything is done everything goes under vacuum with a vacuumbag with a resin in and vacuum side. For the epoxy resin I went for the IN2 infusion resin from Easy Composites. I've mixed it with the fast and slow hardener combined. That way I have a potlife of around 45 min which should be enough for this small infusion. To give you an idea, 200 grams total was used here per mask. The technique used is called resin infusion, also called VARTM. You could also make a part like this using the wet lay up technique or vacuumbagging technique. The advantage of resin infusion is that you'll get a way better surface finish without any pinholes or air trapped if properly done. After curing for a minimum of 24 hours at 25°C ambient temperature you can start to demould the part. First the bag is removed, then the peelply with the infusionmesh. Now you are left with only the carbonfiber and epoxy resin. Only thing left to do is use wedges to demould the part and trim. Before applying the clearcoat the part is sanded with a 300 grid sandpaper. That way you remove any relase agent left and create a nice surface where the clearcoat will mechanically bond to. A first layer of clearcoat is applied as a base coat followed by a red for the Tony Stark Iron man mask and a blue candy for the Pepper Potts Rescue Iron man mask. Once cured the part is carefully sanded again with a 600 grit. Now only thing left to do is masking and applying the golden paint followed by an extra layer of clear. If you are looking for even better results, after final clear coat you can sand it again and go on with some polishing for a mirror shinny finish! In case you want to find the products used in this video, you can find them on following website: easycomposites.co.uk For more of my projects make sure to follow me on: Facebook: facebook.com/MAT2COMPOSITES Instagram: matthieu.libeert twitter: @matthieutje65 web: mat2composites.com #carbonfiber #ironman #mask #tonystark